I have been trying to find the perfect compression settings to use when converting my digital images to ‘jpg’ or ‘jpeg’ format that yields the best result in terms of the image quality and the image size. There are various softwares out there that can convert images e.g. Photoshop, ACDsee, ImageConverter etc. I always used to use the same 90% compression settings for converting from ‘bmp’ to ‘Jpg’ and for all my other digital image compressions without much thought. As my photo collection from my digital camera is getting bigger I wanted to efficiently archive my images without losing too much image quality. Also after taking a look at my monthly bandwidth usages for my website, I found that the images are consuming the highest bandwidth. So I needed to be more efficient on the image compression of the images that I use for my website to save bandwidth(How to save website’s bandwidth and storage usage)
Converting Image from BMP to JPG
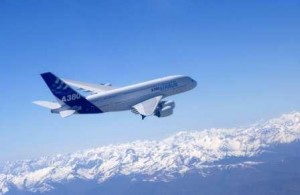
I did a little experiment with the following image (This is just a compressed version of the original image).

Original Image Properties
Image Type: Bitmap Image
Image size: 3.94 MB
Image Width: 1454 pixels
Image Height: 947 pixels
Horizontal Resolution: 96 dpi
Vertical Resolution: 96 dpi
Bit Depth: 24
Frame Count: 1

Original Image Properties
Image Type: Bitmap Image
Image size: 3.94 MB
Image Width: 1454 pixels
Image Height: 947 pixels
Horizontal Resolution: 96 dpi
Vertical Resolution: 96 dpi
Bit Depth: 24
Frame Count: 1
I converted the Image into JPG format using various compression settings (100% – 5%) and recorded the resulted image size for each settings.
Compression settings (%) | Image Size (KB) |
100 | 909 |
95 | 389 |
90 | 235 |
85 | 171 |
80 | 136 |
75 | 112 |
70 | 99 |
65 | 88 |
60 | 79 |
55 | 73 |
50 | 69 |
45 | 65 |
40 | 60 |
35 | 57 |
30 | 52 |
25 | 48 |
20 | 43 |
15 | 39 |
10 | 33 |
5 | 27 |
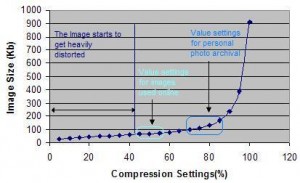
Then I plotted the following graph of Compression setting (%) Vs Image Size (KB) from the above data.
After analysing the Image quality and the image sizes I found out that even using 80% compression setting yields a nearly same quality photo which is good enough for my digital photo collection archival purpose. Even 50% compression setting yields a usable image that can be used on my website without significant difference from previous but I save a lot on the site’s storage and bandwidth.
Before, I was using 90% compression setting which resulted an image size of 235 KB. Using 50% compression setting, the resulting image size is 69 KB. So I save about:
(235 – 69) = 166 KB per image.
Multiply that by 1000 unique visitors and I get:
(166*1000) = 166000 KB = 166 MB savings from one image!
(235 – 69) = 166 KB per image.
Multiply that by 1000 unique visitors and I get:
(166*1000) = 166000 KB = 166 MB savings from one image!
You may need to find out your own sweet spot of compression settings that you like to use based on the image quality that you prefer but the general message is that it pays off to use different compression settings based on the situation.


No comments:
Post a Comment